A Twisted Solar Eruptive Prominence

Credit: SOHO Consortium, EIT, ESA, NASA
Click picture to go to NASA APOD site for full explanation
Unusual Light Patch Under Phoenix Lander on Mars

Credit: Phoenix Mission Team, NASA, JPL-Caltech, U. Arizona
Click picture to go to NASA APOD site for full explanation
The Dark River to Antares

Credit & Copyright: Máximo Ruiz
Click picture to go to NASA APOD site for full explanation
Chasing the ISS

Credit & Copyright: Jürgen Michelberger
Click picture to go to NASA APOD site for full explanation
Spitzer's Milky Way

Credit: GLIMPSE, MIPSGAL, NASA, JPL-Caltech, Univ. Wisconsin
Click picture to go to NASA APOD site for full explanation
Two-Armed Spiral Milky Way

Illustration Credit: R. Hurt (SSC), JPL-Caltech, NASA Survey Credit: GLIMPSE
Click picture to go to NASA APOD site for full explanation
June's Young Crescent Moon

Credit & Copyright: Miguel Claro
Click picture to go to NASA APOD site for full explanation
Mars Soil Sample Ready to Analyze

Credit: Phoenix Mission Team, NASA, JPL-Caltech, U. Arizona
Click picture to go to NASA APOD site for full explanation
Saturn's Rings from the Other Side

Credit: Cassini Imaging Team, SSI, JPL, ESA, NASA
Click picture to go to NASA APOD site for full explanation
A Fire Rainbow Over New Jersey

Credit & Copyright: Paul Gitto (Arcturus Observatory)
Click picture to go to NASA APOD site for full explanation
Dextre Robot at Work on the Space Station

Credit: STS-124 Crew, Expedition 17 Crew, NASA
Click picture to go to NASA APOD site for full explanation
Phoenix and the Snow Queen

Credit: Kenneth Kremer, Marco Di Lorenzo, Phoenix Mission, NASA, JPL, UA, Max Planck Inst., Aviation Week and Space Technology
Click picture to go to NASA APOD site for full explanation
At Last, GLAST

Image Credit: Jerry Cannon, Robert Murray, NASA
Click picture to go to NASA APOD site for full explanation
M51 Hubble Remix

Credit: S. Beckwith (STScI), Hubble Heritage Team, (STScI/AURA), ESA, NASA Additional Processing: Robert Gendler
Click picture to go to NASA APOD site for full explanation
Phoenix Digs for Clues on Mars

Credit: Phoenix Mission Team, NASA, JPL-Caltech, U. Arizona, Texas A&M University
Click picture to go to NASA APOD site for full explanation
Inside the Coma Cluster of Galaxies

Credit: NASA, ESA, Hubble Heritage (STScI/AURA); Acknowledgment: D. Carter (LJMU) et al. and the Coma HST ACS Treasury Team
Click picture to go to NASA APOD site for full explanation
Eta Carinae and the Homunculus Nebula

Credit: N. Smith, J. A. Morse (U. Colorado) et al., NASA
Click picture to go to NASA APOD site for full explanation
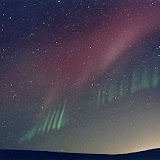
Pyramid Ice Crystal Halos Over Finland

Credit & Copyright: Kari Nyman
Click picture to go to NASA APOD site for full explanation
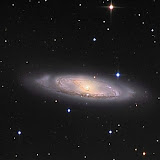
The Star Streams of NGC 5907

Image Credit & Copyright: R Jay Gabany (Blackbird Observatory) - collaboration; D.Martínez-Delgado(IAC, MPIA), J.Peñarrubia (U.Victoria) I. Trujillo (IAC) S.Majewski (U.Virginia), M.Pohlen (Cardiff),
Click picture to go to NASA APOD site for full explanation
Solstice Moonrise, Cape Sounion

Credit & Copyright: Anthony Ayiomamitis (TWAN)
Click picture to go to NASA APOD site for full explanation
Vanishing Act

Phoenix Mission Team, NASA, JPL-Caltech, U. Arizona, Texas A&M University
Click picture to go to NASA APOD site for full explanation
Barred Spiral Galaxy NGC 1300

Credit: Hubble Heritage Team, ESA, NASA
Click picture to go to NASA APOD site for full explanation
The International Space Station Expands Again

Credit: STS-124 Shuttle Crew, NASA
Click picture to go to NASA APOD site for full explanation
Ithaca Chasma: The Great Rift on Saturn's Tethys

Credit: Cassini Imaging Team, SSI, JPL, ESA, NASA
Click picture to go to NASA APOD site for full explanation
What is Hanny's Voorwerp?

Credit: Galaxy Zoo Project, ING
Click picture to go to NASA APOD site for full explanation
M27: Not A Comet

Credit & Copyright: Nik Szymanek, w/Faulkes Telescope North
Click picture to go to NASA APOD site for full explanation
M81: Feeding a Black Hole

Credit: X-ray: NASA/CXC/Wisconsin/D.Pooley & CfA/A.Zezas; Optical: NASA/ESA/CfA/A.Zezas; UV: NASA/JPL-Caltech/CfA/J.Huchra et al.; IR: NASA/JPL-Caltech/CfA
Click picture to go to NASA APOD site for full explanation
Fireball at Ayers Rock

Credit & Copyright: Joseph Brimacombe
Click picture to go to NASA APOD site for full explanation
Shadow of a Martian Robot

Credit: Mars Exploration Rover Mission, JPL, NASA
Click picture to go to NASA APOD site for full explanation
In the Center of the Trifid Nebula

Credit & Copyright: Daniel Lopez (Observatorio del Teide)
Click picture to go to NASA APOD site for full explanation
Permanent Backlink to Post


No comments:
Post a Comment